Materials
Links and pictures for each material used are provided in the slideshow below.
Final bom
Bill of Materials
|
1. Programmable lights QTY:2
2. Fiber fill 3. White paper lanterns 4. Arduino adapter 5. Arduino uno 6. DC power port connecter 7. Fishing line 8. 1/2 inch dowel Vertical Divider
|
$15.99
$8.97 $7.68 $5.49 $ 18.82* $5.99* $2.49* $5.14* *Already available in class Total: $ 70.57
|
instructions
Step one: Code
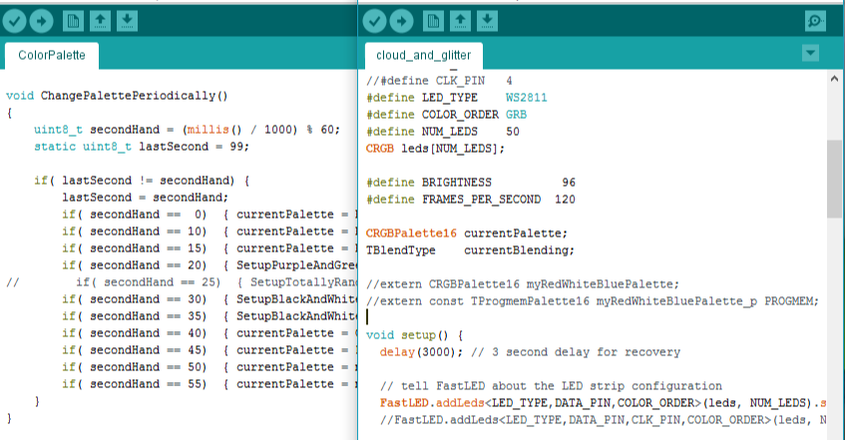
Sample Code:
#include "FastLED.h"
// we built off the example DemoReel Code from the fastLED library
// the colors are changed to the Cloud Color Palette which includes white and blue lights
FASTLED_USING_NAMESPACE
#if FASTLED_VERSION < 3001000
#error "Requires FastLED 3.1 or later; check github for latest code."
#endif
#define DATA_PIN 2
//#define CLK_PIN 4
#define LED_TYPE WS2811
#define COLOR_ORDER GRB
#define NUM_LEDS 50
CRGB leds[NUM_LEDS];
#define BRIGHTNESS 96
#define FRAMES_PER_SECOND 120
CRGBPalette16 currentPalette;
TBlendType currentBlending;
//extern CRGBPalette16 myRedWhiteBluePalette;
//extern const TProgmemPalette16 myRedWhiteBluePalette_p PROGMEM;
void setup() {
delay(3000); // 3 second delay for recovery
// tell FastLED about the LED strip configuration FastLED.addLeds(leds, NUM_LEDS).setCorrection(TypicalLEDStrip);
//FastLED.addLeds(leds, NUM_LEDS).setCorrection(TypicalLEDStrip);
// set master brightness control
FastLED.setBrightness(BRIGHTNESS);
currentPalette = CloudColors_p;
currentBlending = LINEARBLEND;
}
// List of patterns to cycle through. Each is defined as a separate function below.
typedef void (*SimplePatternList[])();
SimplePatternList gPatterns = { rainbowWithGlitter, bpm };
uint8_t gCurrentPatternNumber = 0; // Index number of which pattern is current
uint8_t gHue = 0; // rotating "base color" used by many of the patterns
void loop()
{
// Call the current pattern function once, updating the 'leds' array
gPatterns[gCurrentPatternNumber]();
// send the 'leds' array out to the actual LED strip
FastLED.show();
// insert a delay to keep the framerate modest
FastLED.delay(1000/FRAMES_PER_SECOND);
// do some periodic updates
EVERY_N_MILLISECONDS( 20 ) { gHue++; } // slowly cycle the "base color" through the rainbow
EVERY_N_SECONDS( 10 ) { nextPattern(); } // change patterns periodically
}
#define ARRAY_SIZE(A) (sizeof(A) / sizeof((A)[0]))
void nextPattern()
{
//add one to the current pattern number, and wrap around at the end
gCurrentPatternNumber = (gCurrentPatternNumber + 1) % ARRAY_SIZE( gPatterns);
}
void rainbowWithGlitter()
{
// built-in FastLED rainbow, plus some random sparkly glitter
addGlitter(80);
}
void addGlitter( fract8 chanceOfGlitter)
{ if( random8() < chanceOfGlitter) {
leds[ random16(NUM_LEDS) ] += CRGB::White;
leds[ random16(NUM_LEDS) ] += CRGB::White;
leds[ random16(NUM_LEDS) ] += CRGB::Blue;
leds[ random16(NUM_LEDS) ] += CRGB::Gray;
}
}
void bpm()
{ // colored stripes pulsing at a defined Beats-Per-Minute (BPM)
uint8_t BeatsPerMinute = 62;
CRGBPalette16 palette = CloudColors_p;
uint8_t beat = beatsin8( BeatsPerMinute, 64, 255);
for( int i = 0; i < NUM_LEDS; i++) { //9948
leds[i] = ColorFromPalette(palette, gHue+(i*2), beat-gHue+(i*10));
}
}
// we built off the example DemoReel Code from the fastLED library
// the colors are changed to the Cloud Color Palette which includes white and blue lights
FASTLED_USING_NAMESPACE
#if FASTLED_VERSION < 3001000
#error "Requires FastLED 3.1 or later; check github for latest code."
#endif
#define DATA_PIN 2
//#define CLK_PIN 4
#define LED_TYPE WS2811
#define COLOR_ORDER GRB
#define NUM_LEDS 50
CRGB leds[NUM_LEDS];
#define BRIGHTNESS 96
#define FRAMES_PER_SECOND 120
CRGBPalette16 currentPalette;
TBlendType currentBlending;
//extern CRGBPalette16 myRedWhiteBluePalette;
//extern const TProgmemPalette16 myRedWhiteBluePalette_p PROGMEM;
void setup() {
delay(3000); // 3 second delay for recovery
// tell FastLED about the LED strip configuration FastLED.addLeds
//FastLED.addLeds
// set master brightness control
FastLED.setBrightness(BRIGHTNESS);
currentPalette = CloudColors_p;
currentBlending = LINEARBLEND;
}
// List of patterns to cycle through. Each is defined as a separate function below.
typedef void (*SimplePatternList[])();
SimplePatternList gPatterns = { rainbowWithGlitter, bpm };
uint8_t gCurrentPatternNumber = 0; // Index number of which pattern is current
uint8_t gHue = 0; // rotating "base color" used by many of the patterns
void loop()
{
// Call the current pattern function once, updating the 'leds' array
gPatterns[gCurrentPatternNumber]();
// send the 'leds' array out to the actual LED strip
FastLED.show();
// insert a delay to keep the framerate modest
FastLED.delay(1000/FRAMES_PER_SECOND);
// do some periodic updates
EVERY_N_MILLISECONDS( 20 ) { gHue++; } // slowly cycle the "base color" through the rainbow
EVERY_N_SECONDS( 10 ) { nextPattern(); } // change patterns periodically
}
#define ARRAY_SIZE(A) (sizeof(A) / sizeof((A)[0]))
void nextPattern()
{
//add one to the current pattern number, and wrap around at the end
gCurrentPatternNumber = (gCurrentPatternNumber + 1) % ARRAY_SIZE( gPatterns);
}
void rainbowWithGlitter()
{
// built-in FastLED rainbow, plus some random sparkly glitter
addGlitter(80);
}
void addGlitter( fract8 chanceOfGlitter)
{ if( random8() < chanceOfGlitter) {
leds[ random16(NUM_LEDS) ] += CRGB::White;
leds[ random16(NUM_LEDS) ] += CRGB::White;
leds[ random16(NUM_LEDS) ] += CRGB::Blue;
leds[ random16(NUM_LEDS) ] += CRGB::Gray;
}
}
void bpm()
{ // colored stripes pulsing at a defined Beats-Per-Minute (BPM)
uint8_t BeatsPerMinute = 62;
CRGBPalette16 palette = CloudColors_p;
uint8_t beat = beatsin8( BeatsPerMinute, 64, 255);
for( int i = 0; i < NUM_LEDS; i++) { //9948
leds[i] = ColorFromPalette(palette, gHue+(i*2), beat-gHue+(i*10));
}
}
Step two: Lights
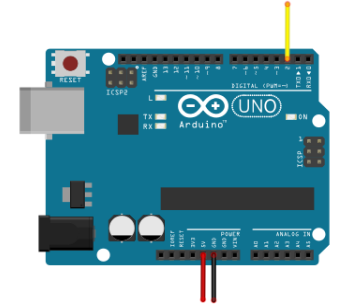
- Before connecting the wires from to the Arduino and lights, make sure that you are connecting the lights through the input end with the white arrow with the loose wires
- Take one wire and attach it to the 5V and the other end on the DC power port connector (+)
- Take a second wire and attach it to the GND and the other end on the DC power port connector (-)
- Take a third wire and attach it to the red wire (on the LED) and the other end on the DC power port connector (+)
- Screw the DC power port connector (+) tight on the two wires
- Take a forth wire and attach it to the blue wire (on the LED) and the other end on the DC power port connector (-)
- Screw the DC power port connector (-) tight on the two wires
- Using the fifth wire, connect one end on the white wire (on the LED) and the other end on the Arduino at 2 (as shown in the image
- Once all the wires are connected to the lights to the arduino connect the USB cable to the aruduino and the computer to upload the code
Step three: Cloud
|
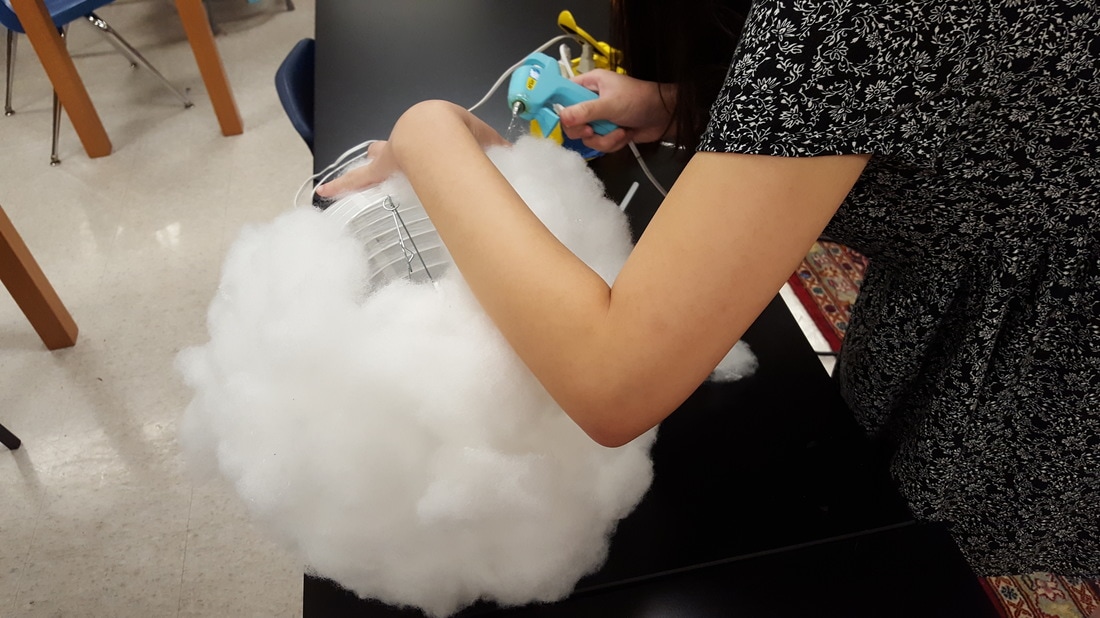
|
Step four: putting it all together
- Put lights into the paper lantern with the power source easily accessible at the bottom of the cloud
- Obtain fishing line and cut to desired length
- Attach the string to the top of the lantern on the metal corners
- Tie string to ceiling or a wooden dowel if preferred
step five: Operating instructions
- Hang Cloud Lamps from the ceiling or place on any surface.
- Find on switch at the top of the inside of the cloud
- Turn lights on
